(From Kolbe and Kramer, Planning Seafood Freezing)2001
Each has tradeoffs related to accuracy, ease of use, cost, and the risk of getting terrible results. The method chosen might also depend on whether you are trying to design a process or just monitor quality assurance in an existing process. Probably the most common approach in the industry, particularly for frozen blocks, is to drill and probe. This doesn't really measure "freeze time," but it tells the operator the approximate core temperature at the end of the freezing cycle.
Temperature Measurement and Fish, the Torry Advisory Note of J. Graham (1977), gives a good account of these practices.
The procedure for drill-and-probe is this:
Remove the frozen product from the freezer or cold store and immediately drill a deep (4 inches or more) small-diameter hole only slightly larger than the diameter of your temperature sensor. If the active part of the sensor is right at its tip, and if it contacts the bottom of the hole long enough for everything to equilibrate (maybe a minute or so), then you can expect to measure temperatures within 1 degree F of the actual core temperature. However, if done wrong, errors can reach 35 degrees F (Graham, 1977; Johnston et al., 1994). Our demonstrations with frozen surimi blocks have found that temperatures can easily vary from right-on to 10–12 degrees F too high.
Clearly, one of the best and most accurate methods of measuring freezing progress and time is using thermocouples. A thermocouple is formed when two different metal alloy wires are welded (or soldered) together. The temperature of the junction (compared electronically with a reference temperature) is uniquely related to an electrical voltage, which is transformed by some kind of meter directly into a temperature readout.
Table I

Gives three common thermocouple types and the color coded conventions for insulation and connectors.
In its simplest form, a thermocouple probe is made of two insulated wires, exposed and fused at the very end, then poked into the product center before freezing. In stationary freezers and cold rooms, the wires can be led out to a hand-held meter, length doesn’t matter. Then an operator can read and record the temperatures by hand every 10 minutes, or at some interval appropriate to the process. If plotted, these temperatures would draw, in effect, a curve that appears similar to Figure 1. Once freezing is complete, the wire can be snipped off (assuming the product is to be discarded) and a new couple quickly made by re-twisting and soldering the two wires.
In some temperature sensors, the thermocouple wires are fixed inside a thin-walled stainless tube, which often has a handle on the opposite end. The tube serves as the probe that can be poked into a fish or package effortlessly. Wires are protected from breakage, moisture and corrosion.
Figure 1
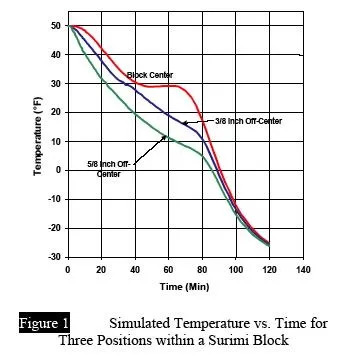
Figure 2
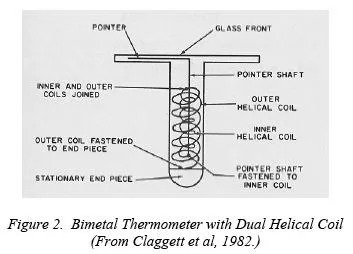
Bi-metal Thermometer with Dual Helical Coil
Such hollow-tube probes contain other types of temperature sensors as well. One handheld type commonly used is the Dial Thermometer (Figure 2). As temperature changes at the tip, the bi-metal coil tightens or loosens according to the different thermal expansion characteristics of the two metals. This action connects to a pointer at the free end that twists to indicate the temperature on a dial. It is not difficult to see how twisting, bending, bumping, or just age of this type of thermometer would lead to some serious errors.
Another hand-held type of dial thermometer uses a thermistor, a solid-state bead seated inside the tip of the probe. Its voltage signal is uniquely related to temperature. A small battery converts this signal to a digital read-out at the other end of the tube. Thermistors are accurate and stable, but because of relatively high cost, are less disposable than thermocouples. They also may not operate correctly when the battery-driven instrumentation is exposed to very low temperatures. These temperature measurement devices are all most suitable for stationary or real-time measurements. What do you do if a product is not stationary? For example, if you want to know the temperature of a fillet as it travels through a spiral freezer. Or if you would like to follow the temperature of a container-load of frozen blocks delivered by barge. Partly as a result of HACCP food safety programs, we have seen the development of numerous tiny, easy to use data loggers that can sample, store, then report temperatures (among other things) at whatever rate you select. Some have the sensor element built into the body of the recorder. But if freezing time is to be measured, you'll need one with a remote sensor that can be poked into the center of a product. Some difficulties result if the connector between sensor and logger is not sealed, allowing moisture to condense onto the connector or electronics as the logger is removed from the cold room. In addition, some recorders (and batteries) cannot themselves operate when freezer temperatures get too low. Bradley (2000) reports on a number of water-resistant options available as of the Spring of 2000. The products, prices, and choices are changing continually, however.
The Appendix gives Web-site addresses for the manufacturers reported by Bradley.
TEMPERATURE MEASUREMENT ERRORS
As you use any of these temperature measurement devices, there are several things that will cause errors - and most relate to how the device is used.
1. Instrument Error
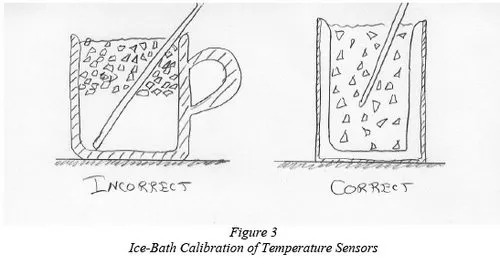
No sensor will give the exactly correct reading, although thermistors and thermocouples are usually close - within a degree or two. Dial thermometers are notoriously inaccurate. Whichever sensor you're using, it is important to calibrate it often. For low-temperature readings, calibrate in a mixture of ice and fresh water, preferably mixed in a vacuum walled thermos container. (See also DeBeer, 1998). Do this carefully because the water can stratify into layers of different temperatures. The heaviest water is at 39.2 degrees F 4 degree F) and it will sink to the bottom (Figure 3). To calibrate, first adjust the reading on the meter if possible, or simply write down the difference between your reading and 32 degree F, and use that difference to correct all the readings that you take.
2. Misplacement
It is often tricky to place the sensor in the exact spot of interest. Figure I showed us what happened if a probe wasn't located at the geometric center and the last point to freeze. Similar problems can result if the product itself is not freezing evenly, in which case your probe, though geometrically centered, is still not placed in the "last-point-to-freeze". And finally, some error will result, particularly in small products, if you don't know where, inside the probe sheath, the actual temperature sensing element is. We usually assume it to be right at the tip, but check that by gripping it between your fingers and noting the temperature jump on the meter.

Conduction Error
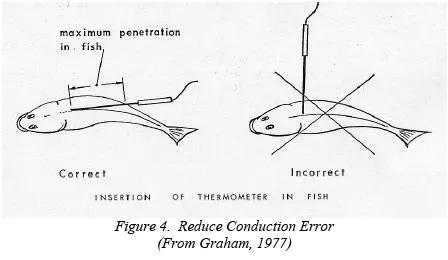
For the walls of a stainless-steel probe, k is a significant number (like 8) compared to that of frozen fish (0.8) or unfrozen fish (0.28). So when a metal probe is inserted into a fish, as in Figure 4, the penetration (l in our equation) must be deep. If it is not, heat will flow rapidly from the warm air (To HOT) to the tip of the probe inside the fish (TO COLD), heating the probe and giving an erroneously
high-temperature reading.
4. Time Constant
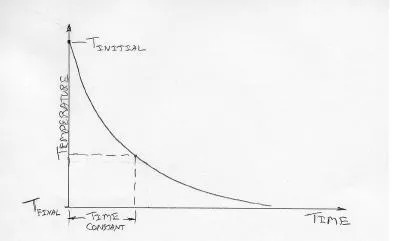
When a temperature sensor experiences a step change in its surrounding temperature, for example, when it is thrust into a fish, it will take a while for that reading to adjust (Figure 5).
Engineers use the term "time constant" to describe the time it takes for about 2/3 of the change to
take place. This could be less than a second for a minimal thermocouple thrust into an ice-bath. But if the sensor is heavy, and it is exposed to a medium in which heat transfer is fairly slow (like still air), the time constant could be many minutes. Watch out for this if you're trying to measure rapidly changing temperatures using a big sensor with a large time constant.
Lack of steady state
Sometimes you're trying to catch the temperature of a product that you just pulled from the freezer. The sensor's time-constant will affect your accuracy, as described above. But you'll also need to think about the non-steady temperature of the product itself. When the just-frozen product is exposed to the warm air in the process room, it will begin to warm. Blocks could warm up at the rate of 1 degree F every minute or two. Smaller products such as fillets or crab sections will heat up much faster. We've measured the core temperature of small fillets which increased 25 degrees F within 10 minutes of leaving a spiral freezer.
6. Radiation
Although not a problem when measuring freeze times of a product, heat loss by radiation often affects the accuracy of air temperature readings. You'd like to think that a probe held in the air will take on the temperature of the air and so record it correctly. But if that probe can "see" a colder nearby surface, it will lose heat to that surface by radiation heat transfer. This relates to the sensation of your hand next to a window on a cold winter night. It feels cold because it loses heat at night by radiation through the window. The result for our probe, in this example, is an erroneously low air temperature reading. The solution to this problem is to use a radiation shield - a small cover around the probe that will block off the "line-of-sight", but still allow the air to circulate freely.
REFERENCES
ASTM (American Society for Testing and Materials). 1981. Manual on the use of thermocouples in temperature measurement.
Special Technical Publication 470 B. ASTM
Philadelphia.
Bradley, E. 4/2000. Temperature loggers for the food industry, a partial list. OSU Food Innovation Center.
Claggett, T.J., W.A. Clayton, B.G Liptak, R.W. Worrall. 1982. Temperature measurements.
Chapter IV IN Instrument Engineers' Handbook. B.G. Liptak, K Venczel, ed. Chilton Book
Co. Radnor, PA
DeBeer, J. 1998. Accurately measuring seafood temperatures.
http://seafood.ucdavis.edu/pubs/tempdoc.htm.
Graham, J. 1977. Temperature and temperature measurement. Torry Advisory Note No. 20. Ministry of Agriculture, Fisheries and Food. Torry Research Station.
Johnston, W.A., F.J. Nicholson, A. Roger, G.D. Stroud. 1994. Freezing and refrigerated storage
in fisheries. FAO Fisheries Technical Paper 340. Food and Agriculture Organization of the United Nations. Rome. Available for $17.00 (plus shipping) from Bernan Distributors
(Washington, DC); (800) 274-4888
Omega Engineering. 1998. Bluecat Buyer's Guide Book 1. Stamford, CT
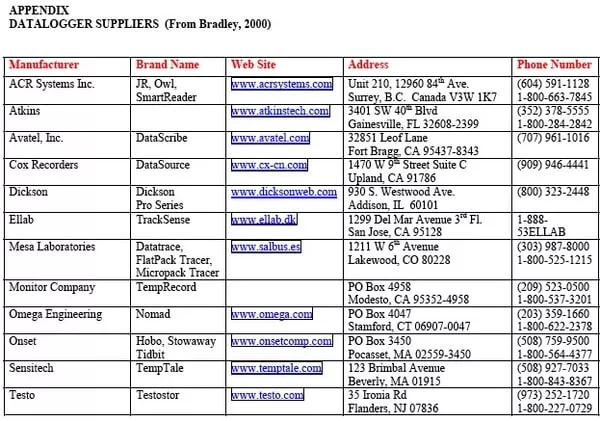
DATALOGGER SUPPLIERS (From Bradley, 2000)
